Set up load balancing with HAProxy
The main use case for HAProxy in this scenario is to distribute incoming HTTP(S) and TCP requests from the Internet to front-end services that can handle these requests. This tutorial shows you one such example using a demo web application.
HAProxy version 1.8+ (LTS) includes the server-template directive, which lets users specify placeholder backend servers to populate HAProxy’s load balancing pools. Server-template can use Consul as one of these backend servers, requesting SRV records from Consul DNS.
Reference material
Prerequisites
To perform the tasks described in this tutorial, you need to have a Nomad environment with Consul installed. You can use this Terraform environment to provision a sandbox environment. This tutorial uses a cluster with one server node and three client nodes.
Note
This tutorial is for demo purposes and only assumes a single server node. Please consult the reference architecture for production configuration.
Create and run a demo web app job
Create a job for a demo web application and name the file webapp.nomad.hcl:
job "demo-webapp" { datacenters = ["dc1"] group "demo" { count = 3 network { port "http" { } } service { name = "demo-webapp" port = "http" check { type = "http" path = "/" interval = "2s" timeout = "2s" } } task "server" { env { PORT = "${NOMAD_PORT_http}" NODE_IP = "${NOMAD_IP_http}" } driver = "docker" config { image = "hashicorp/demo-webapp-lb-guide" ports = ["http"] } } }}This job specification creates three instances of the demo web application for you to target in your HAProxy configuration.
Now, deploy the demo web application.
$ nomad run webapp.nomad.hcl==> Monitoring evaluation "8f3af425" Evaluation triggered by job "demo-webapp" Evaluation within deployment: "dc4c1925" Allocation "bf9f850f" created: node "d16a11fb", group "demo" Allocation "25e0496a" created: node "b78e27be", group "demo" Allocation "a97e7d39" created: node "01d3eb32", group "demo" Evaluation status changed: "pending" -> "complete"==> Evaluation "8f3af425" finished with status "complete"Create and run the HAProxy job
Create a job for HAProxy and name it haproxy.nomad.hcl. This HAProxy instance
balances requests across the deployed instances of the web application.
job "haproxy" { region = "global" datacenters = ["dc1"] type = "service" group "haproxy" { count = 1 network { port "http" { static = 8080 } port "haproxy_ui" { static = 1936 } } service { name = "haproxy" check { name = "alive" type = "tcp" port = "http" interval = "10s" timeout = "2s" } } task "haproxy" { driver = "docker" config { image = "haproxy:2.0" network_mode = "host" volumes = [ "local/haproxy.cfg:/usr/local/etc/haproxy/haproxy.cfg", ] } template { data = <<EOFdefaults mode http frontend stats bind *:1936 stats uri / stats show-legends no log frontend http_front bind *:8080 default_backend http_back backend http_back balance roundrobin server-template mywebapp 10 _demo-webapp._tcp.service.consul resolvers consul resolve-opts allow-dup-ip resolve-prefer ipv4 check resolvers consul nameserver consul 127.0.0.1:8600 accepted_payload_size 8192 hold valid 5sEOF destination = "local/haproxy.cfg" } resources { cpu = 200 memory = 128 } } }}Take note of the following key points from the preceding HAProxy configuration:
The
balance typeunder thebackend http_backstanza in the HAProxy configuration is round robin and load-balances across the available services in order.The
server-templateoption allows Consul service registrations to configure HAProxy's backend server pool. Because of this, you do not need to explicitly add your backend servers' IP addresses. The job specifies a server-template namedmywebapp. This template name is not tied to the service name which is registered in Consul._demo-webapp._tcp.service.consulallows HAProxy to use the DNS SRV record for the backend servicedemo-webapp.service.consulto discover the available instances of the service.
Additionally, keep in mind the following points from the Nomad job spec:
This job specification uses a static port of
8080for the load balancer. This allows you to queryhaproxy.service.consul:8080from anywhere inside your cluster to reach the web application.Please note that although the job contains an inline template, you could alternatively use the template stanza in conjunction with the artifact stanza to download an input template from a remote source such as an S3 bucket.
Now, run the HAProxy job.
$ nomad run haproxy.nomad.hcl==> Monitoring evaluation "937b1a2d" Evaluation triggered by job "haproxy" Evaluation within deployment: "e8214434" Allocation "53145b8b" created: node "d16a11fb", group "haproxy" Evaluation status changed: "pending" -> "complete"==> Evaluation "937b1a2d" finished with status "complete"Check the HAProxy statistics page
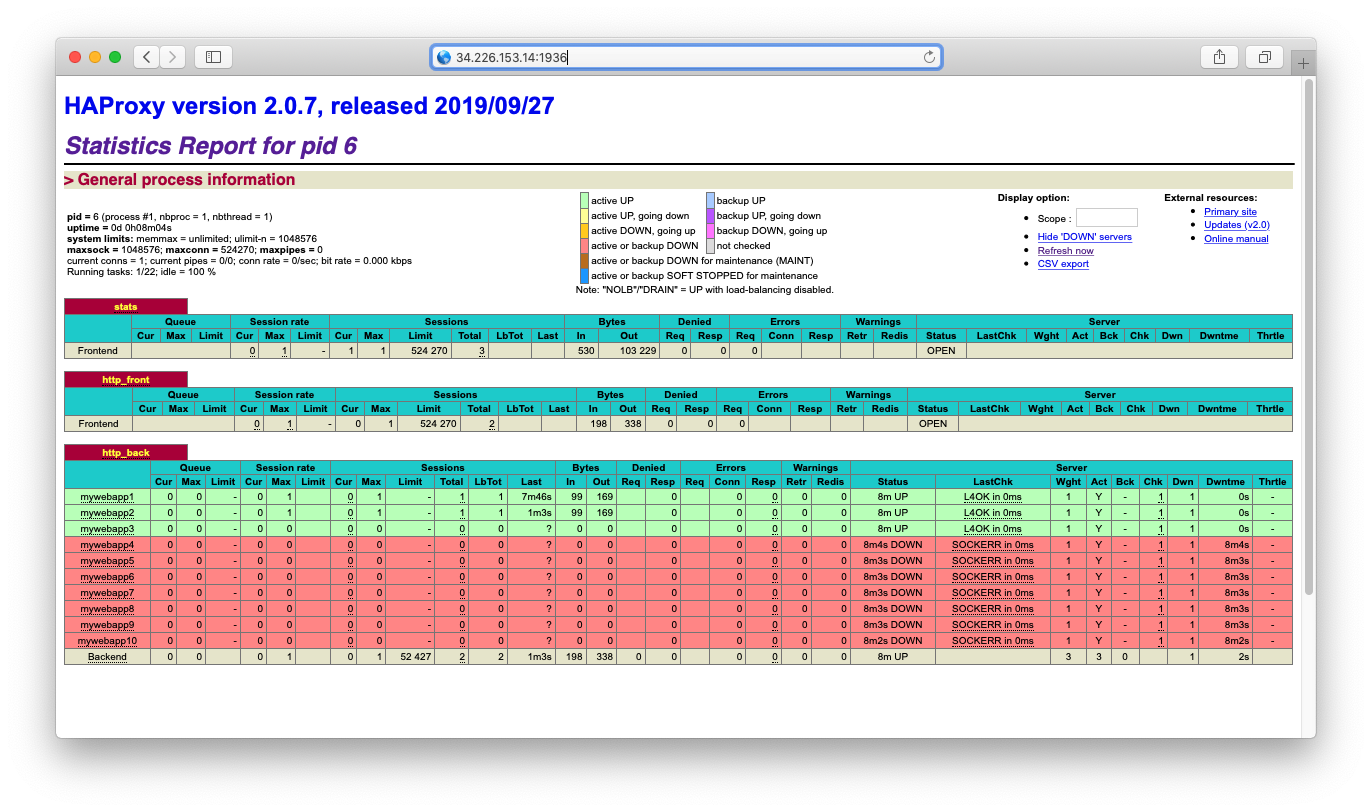
You can visit the statistics and monitoring page for HAProxy at
http://<Your-HAProxy-IP-address>:1936. You can use this page to verify your
settings and for basic monitoring.
Notice there are 10 pre-provisioned load balancer backend slots for your service but that only three of them are being used, corresponding to the three allocations in the current job.
Make a request through the load balancer
If you query the HAProxy load balancer, you should be able to see a response similar to the one shown below (this command should be run from a node inside your cluster):
$ curl haproxy.service.consul:8080Welcome! You are on node 172.31.54.242:20124Note that your request has been forwarded to one of the several deployed instances of the demo web application (which is spread across 3 Nomad clients). The output shows the IP address of the host it is deployed on. If you repeat your requests, the IP address changes based on which backend web server instance received the request.
Note
If you would like to access HAProxy from outside your cluster, you
can set up a load balancer in your environment that maps to an active port
8080 on your clients (or whichever port you have configured for HAProxy to
listen on). You can then send your requests directly to your external load
balancer.
